Hotfix for System Restore Points causing slow boot (Mandatory)
Method 1: Common Troubleshooting
Step 1: Clear Temporary files and Prefetch
Open Run Prompt (Windows Key  +R) Type %temp% and press enter
 +R) Type %temp% and press enter
Select all the files and delete it.
Open Run Prompt (Windows Key +R) Type prefetch and press enter
+R) Type prefetch and press enter
Select all the files and delete it.
Step 2: Increase Virtual Memory
1. Click on Start and right-click on My Computer.
2. Choose Properties.
3. Click on the "Advanced" tab. Under "Performance," click on the "Settings" button.

4. Select Advanced Tab

5. Under "Virtual Memory," click on the "Change" button.
6. Provide the Minimum size in the custom size section to 1.5 times the RAM size and
Maximum size to 3 times of RAM

Step 3: Clean Boot the computer
1. Open Run command by pressing Windows key + R.
2. Type msconfig, and then click OK.
3. Click on Services tab and Check Hide All Microsoft Services

4. Disable all the Services Other than essential services like Logmein and Wireless Services.
5. Click the Startup tab.
6. Click on Disable All
7. Click OK.
8. Click Restart to restart the computer.
Step 4: Set Services some of the services to start manually
Open Run Prompt (Windows Key +R) Type Services.msc
+R) Type Services.msc
Set the startup type of below mentioned Services to Manual
· Application Experience
· Desktop Window Manager Session Manager (Aero will be disabled)
· Diagnostic Policy Service
· Distributed Link Tracking Client
· IP Helper
· Offline Files
· Portable Device Enumerator Service
· Protected Storage
· Remote Registry (Always disable it for Security purposes)
· Secondary Logon
· Security Center
· Tablet PC Input Service
· Themes (Aero will be disabled)
· Windows Error Reporting Service
· Windows Media Center Service Launcher
Step 5: Windows Search Service
Click Start, type services.msc and press Enter.

This will open Services dialogue box.

Now locate the Windows Search service in the list of services, right click it and choose Properties.

In the startup type drop down box, choose the Disabled option.

Click the Apply button, reboot your computer
Step 6: Diagnostic Event logs
Review Performance logs to determine the actual cause for the delay
<![if !vml]><![endif]>1. Open Run Prompt (Windows Key +R)
<![endif]>1. Open Run Prompt (Windows Key +R)
2. Type eventvwr and Click OK
3. Click Applications and Services Logs.
4. Click Microsoft.
5. Click Windows.
6. Click Diagnostics-Performance, and then click Operational.
7. Right Click on any Column name and select Add/remove Columns
<![if !vml]> <![endif]>Add Operational Code
 <![endif]>Add Operational Code
<![if !vml]> <![endif]>Sort the Columns based on Operational Code
 <![endif]>Sort the Columns based on Operational Code
Look for the process with Boot degradation errors
Use friendly Name or file name to determine the device driver that is causing the issue
You May try upgrading or downgrading the driver

Step 7: Check for Windows updates
Open Control Panel
Locate and Open Windows Updates
Click on Check for updates
Install all the updates including the drivers in optional updates
Perform Below mentioned resolution steps only if previous steps don’t resolve the
issue
Method 2: Check disk for errors
Open Command Prompt with Elevated privileges
Execute Below Command
chkdsk /f /r
1.

<![if !vml]>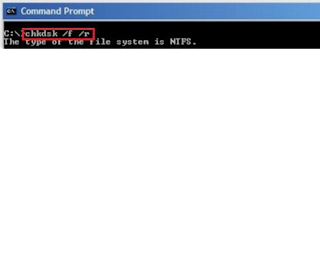 <![endif]><![if !vml]>
<![endif]>
 <![endif]><![if !vml]>
 <![endif]><![if !mso]>
|
2. Install the application
<![if !vml]> <![endif]>
 <![endif]>
3. Open the application after installation is complete
4. In the list of drives right click on primary drive and select Analyze

5. Click on Defrag drop down and then on Quick Defrag

Method 4: Clear Paging during shutdown
Turn Off Antivirus before executing Ultimate Windows Tweaker Download Ultimate Windows Tweaker from below link http://www.thewindowsclub.com/downloads/UWT.zip?b592f7
Click Additional Tweaks
Check Delete Pagefile at shutdown

Click Apply
Method 5: Boot Files defragmentation
Launch Defraggler
Click Settings
Select Boot time defrag
Select Run once

Reboot the computer

Method 6: Uninstall AntiVirus
· Before Uninstalling the Antivirus from the computer Ensure that Customer has Product Key
or access to Antivirus’ Online Account.
· For Antivirus provided by Service provider customer should have access to Service
provider’s download page.
· Some Applications save the Product Key in the Computer (eg. Norton). Backup the keys.
· Antivirus with expired Subscription can be removed without product key but only after customer confirmation.
Uninstall antivirus installed on the customer computer by using the below mentioned KB
article.
No comments:
Post a Comment